Card Making Supply Organizer DIY Craft Project Idea for $5
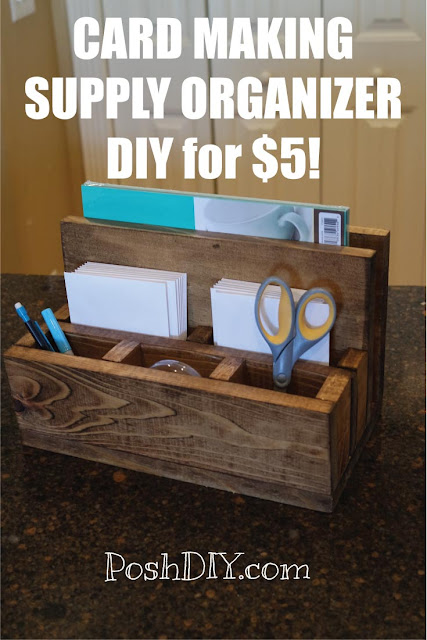
I have a friend who has a birthday coming up very soon. I wanted to make her something that was thoughtful, practical, and looked awesome! Since I know she loves to make cards, I designed and built her this card making supply organizer. It's perfect for holding card making supplies!
That way she can
have the necessary tools easily accessible when she wants to make a
card for someone.
The back section is 13" wide so it is plenty large enough to hold scrapbook paper, and even a paper slicer!
I am glad I wrote down how I made it because I think I'm going to make myself one!
Ok, here are the easy to follow instructions. If you have never made anything out of wood before, I'm hoping you will be able to make this. This is totally easy enough for a beginner. Especially if you get one of the nice guys at Home Depot to cut the wood for you!
Normally I don't have them cut my wood for me but it has been in the 20s this week. I don't have a cozy warm wood shop, so I would normally drag my table saw or my miter saw into the front yard to cut/build something. I wasn't really feeling like it with all the snow and cold. Nah, I just let Home Depot cut it for me and they did a pretty good job!! And they cut it for free! SO WORTH IT!
So here is your cut list:
1x8- cut 3 pieces that are each 13" long
1x4- cut 2 pieces that are 13" long
1x4- cut 7 pieces that are 1.5" long
Other supplies you need:
sandpaper (and an orbital sander would be helpful!)
stain
drill/drill bits/philips head bit
8- 1.25" screws
wood glue
ruler or tape measure
clamp or an extra person
Please note-
the actual size of a 1x8 is .75" x 7.25"
the actual size of a 1x4 is .75" x 3.5"
(WHY DO THEY DO THAT?)
How I figure it costs $5 to make this project:
1x4x36.5"@$2.05 for 8'= $.70
1x8x39"@$9.85 for 8' = $3.50
8 1.25" screws at $.04=$.32
sandpaper, stain, glue=$.50
Total= $5.00
 |
 | |||||
I'm using a Black and Decker orbital sander. It's really nice because it has a filter so it helps on the dust output! And, to replace the sand paper, you just cut a sheet of sandpaper (pretty much any brand!) into 4ths, so it saves you money because you won't need to buy a specific expensive shape of sand paper. I love it and have been using it for a few years with no problems.
I am a huge amazon prime fan! I signed up for their affiliate program so I will get a (very) small percentage if you shop using my links. I will only recommend items I have tested and totally love. If you are looking to get a sander please use this link for the Black and Decker orbital sander.
 | |
I just checked and right now, Amazon is selling the stain cheaper than Home Depot. Here is the link.
I am a huge Minwax fan. I love it because it colors fully using just one coat and it's super easy to apply!
Take a look at this diagram. It shows you how much space to leave between your four 13" long vertical boards. To attach them to the bottom board, use wood glue and 1.25" screws. I used 2 screws for each board. I predrilled my holes with a tiny drill bit and then used a larger bit to drill in about .25" to allow my screws to countersink. It worked well.
 |
 |
| Don't forget to predrill your holes! |
 |
| If you get a little glue in between two boards, wrap a wet paper towel around a ruler or butter knife. |
 | |||||||||
| When you are working on the smaller boards, a clamp will help hold it together while you work. |
 |
After you have attached your 13" boards to the bottom board, glue in the 1.5" section dividers. The glue is plenty strong enough to use without nails for this purpose.
If the section dividers are too large, try sanding them with 60 grit sandpaper! Or else cut new ones to size with a saw. Push down the dividers and then let the glue dry.
All done!!!
Lots of DIY love,
Jessica


Comments
Post a Comment