Solid Wood Blanket Ladder From 2 2x3s DIY Project Idea for $5
I have a friend who loves to sew. Her birthday is coming up and I know she has a lot of quilts she has made. I wanted to make her a gift that she could use and that looks good so I came up with this idea. It was so easy, it only took me about 45 minutes to make.
 This is a super easy project and anyone could make it (even if you have never built anything from wood before!). You just need a few basic tools, screws, and 2- 2x3 boards.
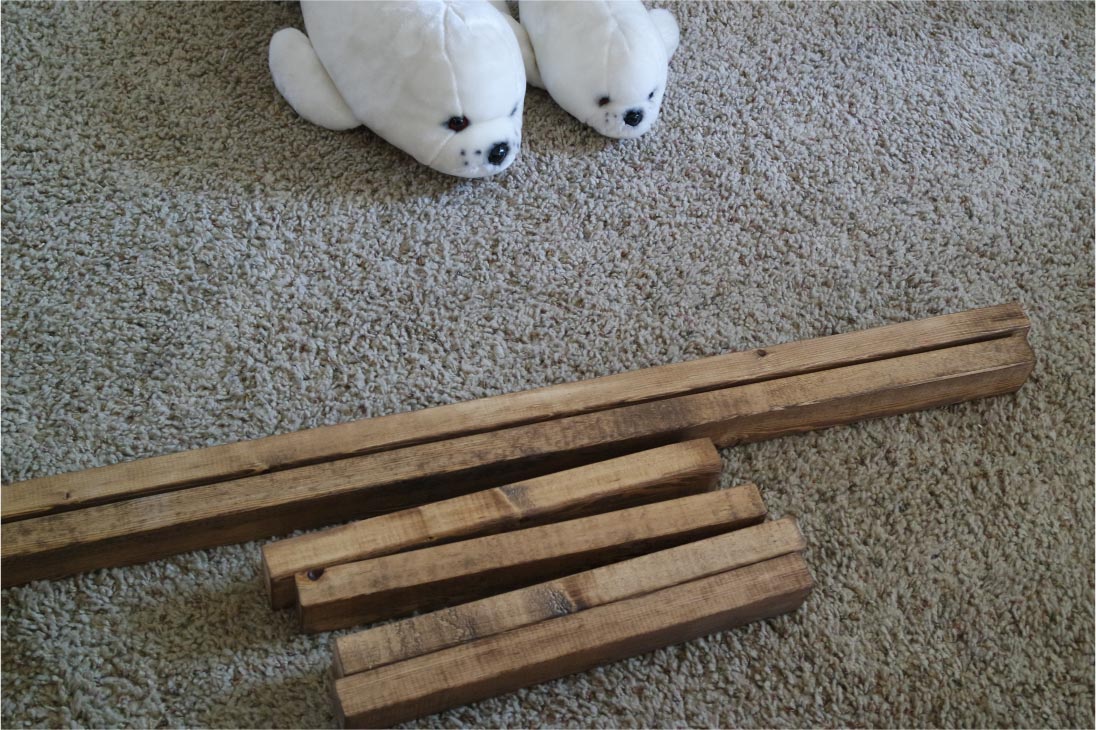
Here is your cut list:
2-2x3x8' boards--cut 2-18" pieces off of each one
This will leave you with 2- 5' pieces and 4- 18" pieces.

Other supplies you need:
sandpaper
orbital sander
stain- I am using Minwax Provincial
drill/drill bits/phillips head screw bit
16- 2" wood screws
wood glue
ruler or tape measure
clamp or an extra person
Please note-
the actual size of a 2x3 is 1.5" x 2.5"
(WHY DO THEY DO THAT?)
How I figure it costs $5 to make this project:
2- 2x3x8'@$1.97 each = $4
16 2" wood screws at $.04 each=$.64
sandpaper, stain, glue=$.36
Total= $5.00

If you have never picked out wood before, try to pick out the wood that is the straightest and has the least amount of knots and imperfections. When you have picked out your wood, find someone who works in the lumber department and just ask them to make the cuts for you. You might want to show them your cut list. I've never had them charge me for cuts. I think technically it is posted that they charge .50 cents per cut but I think they just do that so that they can charge you if you are being a jerk or something. Also, I am pretty sure all the Home Depot's cut wood for free in Utah, but I'm not sure about other parts of the country so you could always call them and ask before you go there.

After the wood is cut, sand it well. -- I'm an Amazon affiliate, which means I get a tiny amount if you buy something using my links (you will still pay the same price). Here is a link for my all time favorite orbital sander.
Then stain the wood. I'm using Minwax Provincial. I love it. The warm is so cozy without being too dark. I love it because it colors fully using just one coat and it's super easy to apply! Amazon is selling the stain cheaper than Home Depot. Here is the link. Make sure you do the staining in a well ventilated area (and this isn't something I let my kids help with due to the fumes).

If you want the tops of your boards to have an angle like this, get ahold of a saw- a miter saw would probably do the best job, but I didn't feel like getting mine out so I just grabbed my trusty jigsaw and that did the trick.
 To get the angle I was wanting so it would look a little nicer when it rests against the wall, I decided to cut an angle on the top of the 2 5' boards. I measured over 3/4" on the top and 1 3/4" on the side. Then I drew a line connecting them. I used my jigsaw to cut on the line. Then I did the same thing for the other 5' board. My jigsaw didn't cut super straight but I went over both of them with my 60 grit sandpaper and orbital sander it looked awesome. I held them together and sanded across both of them at the same time until they looked identical. Try to position the pretty side of the board to go in the front and the uglier side to go toward the back. The side with the angle being cut out will be the back because that is the side that will lean on the wall.
If you don't have a jigsaw or something you can use to make this angled cut, don't worry about it. This isn't a necessary step and will work fine without doing it.
 My kids thought it would be fun if their animals watched for this! :)

When your stain is all dry, lay out the wood so you can position the best looking pieces for the front. I don't normally build wood projects in my living room but it extremely cold out and I don't like the cold, sooooo..... the warm living room seemed like the best option. :)

Now it is assembly time! The most fun part! I made a template for you to use so you know where to predrill your holes. I predrilled the holes on ends of all the small boards (2 on each end) first.
 Then you will need to use your tape measure or a ruler to mark where to put the screws on the sides.
I measured down 6" from the top. I put my template on the 6" mark and used a pencil to mark where the holes go.
 After that, I continued marking every 10' down the line (16", 26", and 36") and used a pencil to mark each hole location using the template.

Then, you will need to pre drill the holes using those pencil marks. I first use a tiny bit to go all the way through, then a larger bit that is the slightly wider than the head of the screw and I drilled in about 1/4" on every screwhole. This allows my nails to countersink very easily.
Then I use a generous amount of wood glue on the ends of the smaller boards and screw them together. This is where having a clamp or another person will help hold it together while you are screwing in the boards.

When you have screwed all the boards together, it should look something like this. This would be a fine place to finish the project, but if you want to fill in the nail holes, I will show you a trick!
 I'm using Minwax Wood Putty. Use your finger to push a good amount of wood putty into the screw hole.
 Then get a water bottle lid or something similar. Put it over the putty and drag the lid right over the hole. It will leave you with a pretty even fill. You can tap it down with your finger a little to finish it up. I like this method because the excess stays in the cap so you can use it to fill the next hole (no waste!)

Here is your cut list:
2-2x3x8' boards--cut 2-18" pieces off of each one
This will leave you with 2- 5' pieces and 4- 18" pieces.
Other supplies you need:
sandpaper
orbital sander
stain- I am using Minwax Provincial
drill/drill bits/phillips head screw bit
16- 2" wood screws
wood glue
ruler or tape measure
clamp or an extra person
Please note-
the actual size of a 2x3 is 1.5" x 2.5"
(WHY DO THEY DO THAT?)
How I figure it costs $5 to make this project:
2- 2x3x8'@$1.97 each = $4
16 2" wood screws at $.04 each=$.64
sandpaper, stain, glue=$.36
Total= $5.00

If you have never picked out wood before, try to pick out the wood that is the straightest and has the least amount of knots and imperfections. When you have picked out your wood, find someone who works in the lumber department and just ask them to make the cuts for you. You might want to show them your cut list. I've never had them charge me for cuts. I think technically it is posted that they charge .50 cents per cut but I think they just do that so that they can charge you if you are being a jerk or something. Also, I am pretty sure all the Home Depot's cut wood for free in Utah, but I'm not sure about other parts of the country so you could always call them and ask before you go there.

After the wood is cut, sand it well. -- I'm an Amazon affiliate, which means I get a tiny amount if you buy something using my links (you will still pay the same price). Here is a link for my all time favorite orbital sander.
Then stain the wood. I'm using Minwax Provincial. I love it. The warm is so cozy without being too dark. I love it because it colors fully using just one coat and it's super easy to apply! Amazon is selling the stain cheaper than Home Depot. Here is the link. Make sure you do the staining in a well ventilated area (and this isn't something I let my kids help with due to the fumes).

If you want the tops of your boards to have an angle like this, get ahold of a saw- a miter saw would probably do the best job, but I didn't feel like getting mine out so I just grabbed my trusty jigsaw and that did the trick.

If you don't have a jigsaw or something you can use to make this angled cut, don't worry about it. This isn't a necessary step and will work fine without doing it.

When your stain is all dry, lay out the wood so you can position the best looking pieces for the front. I don't normally build wood projects in my living room but it extremely cold out and I don't like the cold, sooooo..... the warm living room seemed like the best option. :)
Now it is assembly time! The most fun part! I made a template for you to use so you know where to predrill your holes. I predrilled the holes on ends of all the small boards (2 on each end) first.

I measured down 6" from the top. I put my template on the 6" mark and used a pencil to mark where the holes go.


Then, you will need to pre drill the holes using those pencil marks. I first use a tiny bit to go all the way through, then a larger bit that is the slightly wider than the head of the screw and I drilled in about 1/4" on every screwhole. This allows my nails to countersink very easily.
Then I use a generous amount of wood glue on the ends of the smaller boards and screw them together. This is where having a clamp or another person will help hold it together while you are screwing in the boards.
When you have screwed all the boards together, it should look something like this. This would be a fine place to finish the project, but if you want to fill in the nail holes, I will show you a trick!


Here it is!
Lots of DIY love,
Jessica
Comments
Post a Comment