DIY Hot Cocoa Bar with crystal cabinet pull feet
I recently threw a baby shower for my friend. While I was planning it, I knew I wanted to make some really cute decorations and refreshments. I had seen some really cute ideas of hot cocoa toppings in mason jars all held in a wooden tray (my friend Alison had the cutest one at a church event about a month ago!).
I wanted to glam up the basic idea so I added the really sparkly crystal looking cabinet knobs to the bottom for feet. If you like shabby chic things, this should be right up your alley! And if not, you can certainly customize the basic idea with paint instead of stain, and a different kind of cabinet knobs, or no knobs at all. You can certainly add a little more rustic feel by sanding the wood after you stain it. Or adding a cool decal or paint a design on it.
Make it yours!
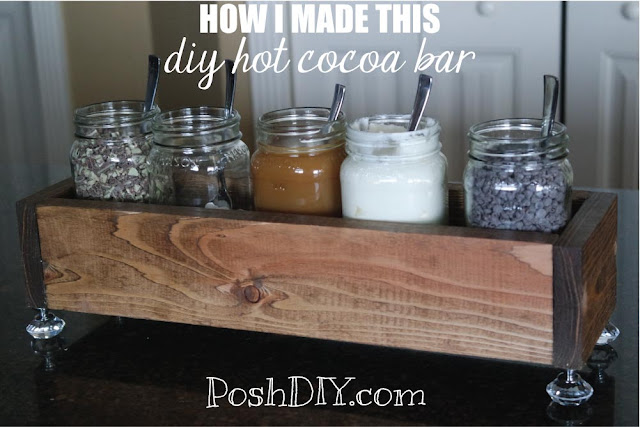
The toppings I used were: Andes mints pieces, mini marshmallows, caramel syrup, homemade whipped cream, and mini chocolate chips. You could also use just about anything else as toppings. Chocolate syrup, crushed candy canes, crushed oreos, raspberry syrup, cinnamon, honey, white chocolate chips, etc. Anything goes!
The jar that looks empty is the one where the marshmallows were. My kids got into this before I could take pictures of it. Imagine me saying "How Rude!" in my Michelle Tanner voice, haha.
You can get 6 pieces from 1 8' board!
Just ask them to cut the board for you (they cut mine for free)!
The actual size of a 1x4 is .75" x 3.5"
1 8' board is $2.05 at Home Depot.
HINT: Check their scrap pile in the back, you might be able to find something that will work for 75% off!
Total- $1.03
2 pieces of 5" of 1x4
You can get 19 pieces from 1 8' board!
Just ask them to cut the board for you (they cut mine for free)!
1 8' board is $2.05 at Home Depot.
HINT: Check their scrap pile in the back, you might be able to find something that will work for 75% off!
Total- $.22
Diamond Looking Cabinet Knob Pulls
You need 4- one for each corner
I got mine from Amazon and was very happy with the quality for the price!
I got a 10 pack for just $8.99 with Amazon Prime, this one: http://amzn.to/2mokvYb
Total- $3.56
Mason Jars
You need 5 jars that will fit in a 16" space. If you have already have some jars that you want to use, just adjust the length you cut your 3 boards so that it is a length that will hold them all. Maybe this is common knowledge, but I was surprised to find that not all mason jars are the same width. I would try to aim for about an inch extra in length for the boards so there is some wiggle room for the jars. So just measure your jars before you cut your wood to make sure it works.
I found mine 12 for $9 at Walmart. Also available at Amazon: http://amzn.to/2moBfyg
Total-$3.75
Misc.
-Sandpaper
-stain (I used Minwax Provincial- http://amzn.to/2lS54cK)
-10 1.25" wood screws
-4 2" wood screws
-wood putty
$.50
Grand total: $9.06
But if you already have the mason jars and could find scrap wood the cost would be significantly cheaper.
After you get your wood cut it will look like this:
 Sand, and stain the wood.
Then, arrange the 3 16" boards like this:
 Then use wood glue and 2 screws per board to attach the sides to the bottom. Remember to predrill your holes!
 Countersink your holes so they can be filled in. It looks better in my opinion. If you like the look of screws just leave them!
Then attach your 5" boards on the ends using the same method of predrilling your holes, and countersinking your screws.
Then, use an angle grinder or something to break off the screw heads. Remember your protection (gloves, ears, eyes, etc.).
Note: You could also try hot gluing the knobs right to the boards instead of using screws. It would be much easier, but I don't think they would last nearly as long as the screw method.

Then use pliers or vice grips to twist your screw into your knob so it looks like this.
 Then predrill holes into the bottom corners of your box and twist in the knobs.
 Lookin' good!!!

Then, fill in the screw holes with wood putty and do any touch up work to make it look awesome, wiping off the dust.
 Wait for it to dry.
Add your favorite toppings to your clean Mason jars, make up a crockpot full of hot cocoa, and have a party!!!

I hope you enjoyed it!
Wishing you lots of DIY love,
Jessica
P.S. If you liked this, show me some love by following me and repinning my project ideas!

And, follow PoshDIY on facebook!

I wanted to glam up the basic idea so I added the really sparkly crystal looking cabinet knobs to the bottom for feet. If you like shabby chic things, this should be right up your alley! And if not, you can certainly customize the basic idea with paint instead of stain, and a different kind of cabinet knobs, or no knobs at all. You can certainly add a little more rustic feel by sanding the wood after you stain it. Or adding a cool decal or paint a design on it.
Make it yours!

The toppings I used were: Andes mints pieces, mini marshmallows, caramel syrup, homemade whipped cream, and mini chocolate chips. You could also use just about anything else as toppings. Chocolate syrup, crushed candy canes, crushed oreos, raspberry syrup, cinnamon, honey, white chocolate chips, etc. Anything goes!
The jar that looks empty is the one where the marshmallows were. My kids got into this before I could take pictures of it. Imagine me saying "How Rude!" in my Michelle Tanner voice, haha.
Here is what you need to make this rustic glam DIY hot cocoa toppings bar:
3 pieces of 16" 1x4You can get 6 pieces from 1 8' board!
Just ask them to cut the board for you (they cut mine for free)!
The actual size of a 1x4 is .75" x 3.5"
1 8' board is $2.05 at Home Depot.
HINT: Check their scrap pile in the back, you might be able to find something that will work for 75% off!
Total- $1.03
2 pieces of 5" of 1x4
You can get 19 pieces from 1 8' board!
Just ask them to cut the board for you (they cut mine for free)!
1 8' board is $2.05 at Home Depot.
HINT: Check their scrap pile in the back, you might be able to find something that will work for 75% off!
Total- $.22
Diamond Looking Cabinet Knob Pulls
You need 4- one for each corner
I got mine from Amazon and was very happy with the quality for the price!
I got a 10 pack for just $8.99 with Amazon Prime, this one: http://amzn.to/2mokvYb
Total- $3.56
Mason Jars
You need 5 jars that will fit in a 16" space. If you have already have some jars that you want to use, just adjust the length you cut your 3 boards so that it is a length that will hold them all. Maybe this is common knowledge, but I was surprised to find that not all mason jars are the same width. I would try to aim for about an inch extra in length for the boards so there is some wiggle room for the jars. So just measure your jars before you cut your wood to make sure it works.
I found mine 12 for $9 at Walmart. Also available at Amazon: http://amzn.to/2moBfyg
Total-$3.75
Misc.
-Sandpaper
-stain (I used Minwax Provincial- http://amzn.to/2lS54cK)
-10 1.25" wood screws
-4 2" wood screws
-wood putty
$.50
Grand total: $9.06
But if you already have the mason jars and could find scrap wood the cost would be significantly cheaper.
Let's get started!
After you get your wood cut it will look like this:

Then, arrange the 3 16" boards like this:


Then attach your 5" boards on the ends using the same method of predrilling your holes, and countersinking your screws.
Then, use an angle grinder or something to break off the screw heads. Remember your protection (gloves, ears, eyes, etc.).
Note: You could also try hot gluing the knobs right to the boards instead of using screws. It would be much easier, but I don't think they would last nearly as long as the screw method.

Then use pliers or vice grips to twist your screw into your knob so it looks like this.


Then, fill in the screw holes with wood putty and do any touch up work to make it look awesome, wiping off the dust.

Add your favorite toppings to your clean Mason jars, make up a crockpot full of hot cocoa, and have a party!!!

I hope you enjoyed it!
Wishing you lots of DIY love,
Jessica
P.S. If you liked this, show me some love by following me and repinning my project ideas!
And, follow PoshDIY on facebook!
Comments
Post a Comment